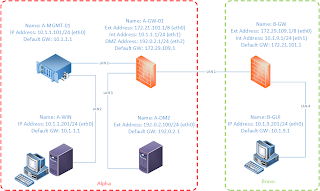
- In this section we will configure the corporate Security Gateway.
In VMware, create a new Virtual Machine (VM) using the iso image. This VM should be defined as follows:
Name: A-GW-01
OS: Other
Version: Other
Disk Space: 20GB
Memory: 1GB
Four Interfaces (ethO through eth3):
eth0
Connect at power on
LAN Segment: LAN 1
eth1
Connect at power on
LAN Segment: LAN 2
eth2
Connect at power on
LAN Segment: LAN 3
eth3
Uncheck Connect at power on
Lab Topology from CCSA:
Detailed steps here:
- Follow the steps from previous posts until next window appears and select Eth1 as management port:

- Press Enter, and the system displays the Management Interface Configuration
screen:
Use the information below to verify that the Network Interface
Configuration is configured properly:

- Follow the same steps as described in previous posts
Note: Don't forget to set the LAN Segment for each Eth Interface: Details HERE
- Follow steps below to activate the default trial license.
Lab Topology from CCSA:

Detailed steps here:
- From the A-WIN virtual machine (in this example), launch an Internet browser such as Firefox / Internet Explorer / Chrome.
In the address field, type the following:
https://10.1.1.101
Note: Be sure that you are using HTTPS. You may also need to verify that the
LANs in VMware are configured properly before you are able to connect.
Both the GUI client machine (A-WIN) and the Security Management
Server (A-MGMT-01) reside on LAN 2.
Press Enter, and your browser should warn you that the site's Security
Certificate is from an untrusted source.

- Ignore this warning and continue to the site. The system displays the login
screen:

- Log into A-MGMT-01.
Press Enter, and the system displays the following message:

- Click Next, and the system displays the Date and time Settings:

- Select the option Use Network Time Protocol (NTP).
In the Primary NTP Server field, type 10.1.1.201
Select the correct Time Zone for your location:

- Click Next, and the system displays the Device Name window.
Use the following information to configure the Device Name window:
Note: Check Point prohibits the use of underscores in object names.

- Click Next, and the system displays Network Connection window:
Default Gateway: Leave Blank (This is configured later.)

- Click Next, and the system displays the Installation Type window:
Default Gateway: Leave Blank (This is configured later.)

- Select Security Gateway or Security Management, and click Next. The system
displays the Products window.
Note: Do NOT select the Security Gateway option.

- Enter admin for the Administrator name and enter your password and confirm it as the
password.
Note: In this step you are configuring the Security Administrator for Check
Point SmartConsole, the application admin.

- Click Next, and the system displays the Security ManagementGUI Clients
window:
Verify that the option Any IP Address is selected.

- Click Next, and the system displays the Summary page:

- Click Finish, and the system prompts you for a response to the following
question:

- Click Yes, and the system proceeds with the configuration:

- Once complete, it displays a message indicating that the configuration was
successful:

- Web Ul displays the configuration settings of the newly
configured Security Management Server:

Note: Don't forget to set the LAN Segment to "Lan Segment 2": Details HERE
Install the R76 Management Server blade on the A-MGMT-01 virtual machine ( VMware Workstation 10).
The management server will manage the corporate gateway and a branch gateway installed in a later lab.
Lab Topology from CCSA:
Note: Don't forget to set the LAN Segment to "Lan Segment 2": Details HERE


